- Ready mixed filler putty
- Woodland Scenics static grass (I use dark green)
- Woodland Scenics Water
- Woodland Scenics Scenic Cement (watered down PVA white glue)
- Woodland Scenics tall grass
- Cardboard/wood base
- Sand/talus and small rocks
- White tacky glue
- Earth toned paint
- Green paint
- Paintbrush and palette
- Dixie cup
- Ink wash
First things first, you need your base. I use more wood now, but in the past I used cardboard. The kind in particular I used was the kind that was the bottom of a 24 pack of bottled water. Whatever you chose, draw out your design and cut it out in the desired shape.
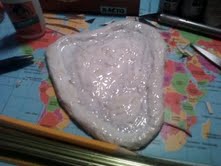
Next is to put filler putty all around the edges of the base. Make sure that it is high enough to contain the water when you pour it later. Here is an example:


Next, when the putty is dry, get some tacky glue and spread it all over the swamp. Then sprinkle sand all over the swamp, as well as a few small rocks in select locations. Wait for it to dry.

Next, get your earth tone paint and paint the entirety of the swamp. You may notice that it is difficult to paint with regular brushstrokes because they will remove the sand. The technique I used, if I remember right, was to load the brush with a lot of the paint and dab the areas. In this way, nothing gets damaged.


After the paint dries, I like to use black ink wash to make the brown blend evenly, as well as to give it a darker, more realistic tone (If you look at the above picture closely, you see small, exposed spots without paint. It is vital to use the ink wash to cover them up). After the ink wash the swamp should look like this:

I forgot to take a picture at the time when it was just ink washed, so this picture shows the results of the ink wash, as well as the static grass. To apply the static grass, let the ink wash dry, then get some watered down PVA white glue and brush it on all of the locations where you want the grass. Try to avoid areas where it will just be submerged anyway, and instead stick to the border and the islands.
You may want some long grass or reeds in your swamp. Woodland Scenics makes tall grass that you can pinch together, cut to size, and glue in place. Glue a couple lumps down with white glue adjacent to the land portions, and now you are ready to add the water.
Woodland Scenics water costs about twenty dollars. I know that sounds expensive, but the swamp water is necessary for the look of the swamp. That, and the water, when hardened, will help to hold down the tall grass clumps at the same time. Get out your Dixie cup and pour in it enough water to fill in the swamp. Add your green paint to the water in the cup and stir it well to mix them. When you are satisfied with the result. pour it into the swamp, letting it settle flat, and remove air bubbles when they appear. For the last time, let it dry.

There you have it: Some swamps to include on your gaming table. The most notable use of swamps in World War II was by the Germans when they flooded the French countryside to discourage allied parachute operations on D-Day. Many allied paratroopers died when they were unable to struggle out of their equipment before drowning. A moment of silence for them...
Anyway, here is a finished picture of the swamp, with some FoW U.S. paras walking across:

Next time I will discuss fields and how to make them for the tabletop. It is really more easy than you think!
-Intrepid